|
Step 1
Start the program and create a document of the size of your monitor. It must be in the RGB color model, this is crucial! To set this color model go to File > Document Color Mode > RGB Color
Step 2
Take the Rectangle Tool (M) and create a rectangle of the same size as the document and fill it with a linear gradient. Try to pick bright and harmonious colors.
Step 3
With the the Polygon Tool, create a hexagonal figure with a radial fill from white to black with 1px grey stroke..
Step 4
Select the figure and change the Blending Mode to "Color Dodge" in the Transparency palette. Keeping the figure selected go to Effect > Blur > Gaussian Blur, and set the Radius value to – 53 pixels.
Step 5
Take the Rectangle Tool (M) and create a R = 26 G = 26 B = 26 rectangle of the same size as our document. It’s important that the color isn’t completely black! Drag the sublayer with the rectangle into the layers palette so that it’s located below the others.
Step 6
Select the rectangle with the gradient fill and change the Blending Mode to "Overlay" in the Transparency palette. Now you can adjust the color of the lower rectangle in your own way by moving the sliders in the Color Palette. I did not change the color.
Step 7
As we have mastered the basic techniques, start creating your wallpaper. Place hexagons of various sizes within the margins of the document to obtain an interesting picture. It’s okay if some of the figures overlap the document, we will solve this problem later. I advise you to apply the Gaussian Blur at the end, when the composition is complete, otherwise your computer will run very slowly.
Step 8
Start to apply the Gaussian Blur, starting from the lower objects, selecting them in the layers palette. Moving from lower objects to the upper ones, change the value of Radius in the range of 53 – 1.5 pixels. Do not apply the effect to the top objects.
Step 9
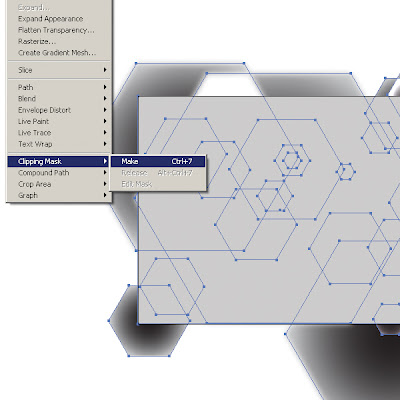
Take the Rectangle Tool (M) and create a rectangle of the same size as the document. Select all the objects (Command + A) and go to Object > Clipping Mask > Make.
Conclusion
Having studied the described technique, you will be able to create interesting desktop wallpapers. You can vary the color, shape, and objects location. I hope you’ve enjoyed this tutorial.
Copy Link: http://vector.tutsplus.com/tutorials/effects/quick-tip-how-create-an-abstract-desktop-wallpaper/ |
Spacious Modern Home Providing Freedom of Movement
13 years ago


0 comments:
Post a Comment